Create a Squarespace Website: Step-by-Step Tutorial (for Beginners)
A website in minutes – that's the promise of Squarespace. In reality, crafting a professional and unique Squarespace website usually takes a bit more time. Beginners might find the process overwhelming at first.
In this guide, we'll explain how Squarespace works and provide a step-by-step walkthrough to help you create your own website, even without prior experience.
Guide: Create a Squarespace Website in 8 Steps
Every Squarespace project is different, but following these eight steps will ensure your website is ready for visitors in no time:
Create a Squarespace Account

Start by creating a Squarespace account. Visit the Squarespace website*, click the “Get Started” button at the top right, and follow the instructions. You can try Squarespace for free for 14 days without providing payment information (more on that later).
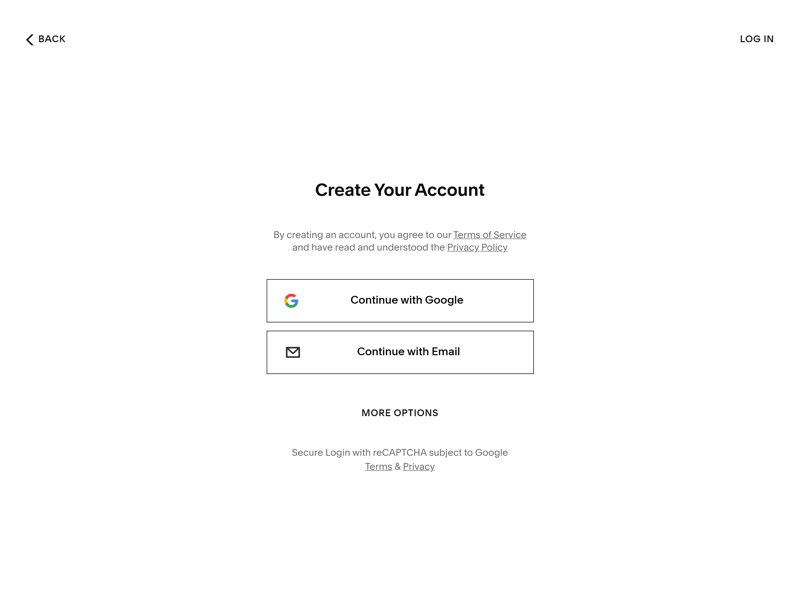
You can sign up via email or with your Google, Apple, or Facebook account.
During registration, Squarespace will ask for information about your project. You can answer these questions to get template suggestions or skip them and browse templates manually.
Pick a Template
Templates are the visual framework of your site. They determine how your content is presented and which features are integrated by default. They'll also give your website a basic structure, which you can then customize further.
During registration, you'll need to pick your first template. But don't worry: You can change it later or quickly create a new project with a different template.
Filter and Browse Templates
Use the filter options to find templates that meet your specific needs. Templates are categorized by type (e.g., Blog, Portfolio, Onepager) and by theme (e.g., Art & Design, Photography, Fashion, Travel).
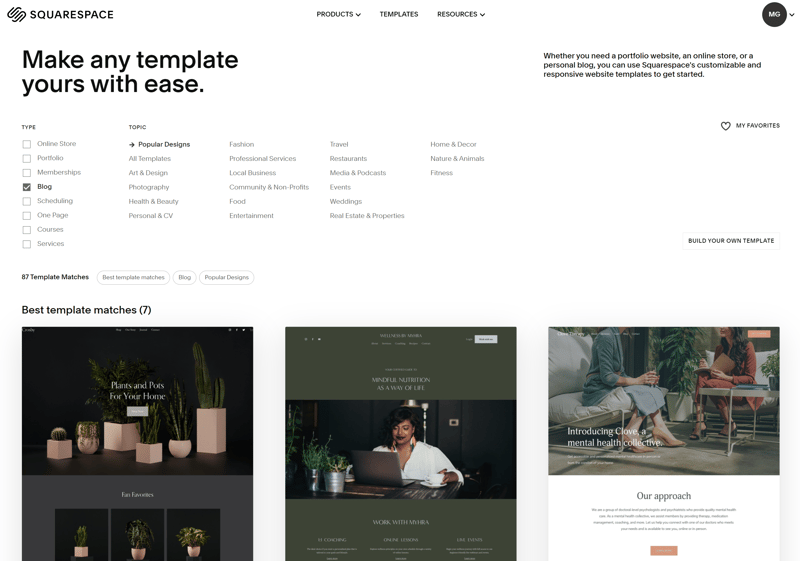
First, choose the right template for your website.
Found a template you like? Best give it a try first: You can open an interactive preview to see its features, click through a demo website created with the template, and compare different color presets.
Use the demo website to get a feel for your site's layout, navigation, and overall look. Of course, you can adjust many of these aspects later. The better the template meets your expectations from the start, the less work you'll have to do in the editor later.
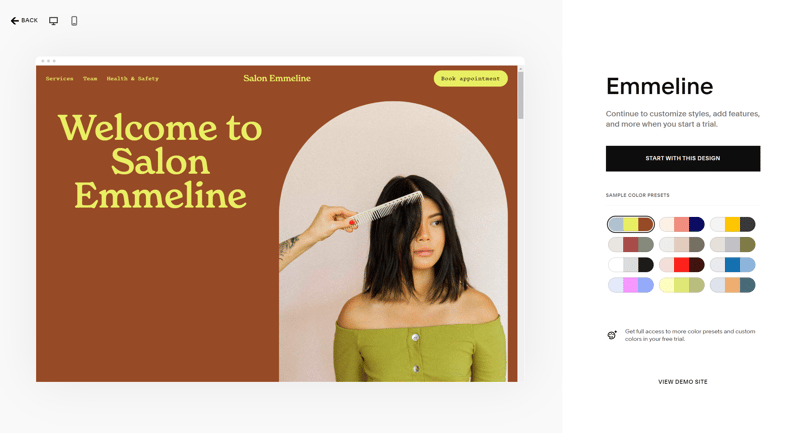
Select and compare different color variations of your template.
Once you find a template you like, click “Start with this design” to complete registration and set up your site. You'll have to give your site a name at this stage, but you can change it later.
After registering, you'll be taken to Squarespace's editor, where a short tutorial explains the basics.
Familiarize Yourself With Squarespace's Account Dashboard
Spend a few minutes getting used to Squarespace's main account dashboard. Learning where to find different features will make it easier to customize your website later.
The dashboard is your project's command center. You’ll use it to manage all of your website's basic settings. In addition to the visual content editor, there are tools for managing and optimizing your online presence, like SEO settings, analytics, marketing tools, and permissions.
The admin area is divided into the following sections:
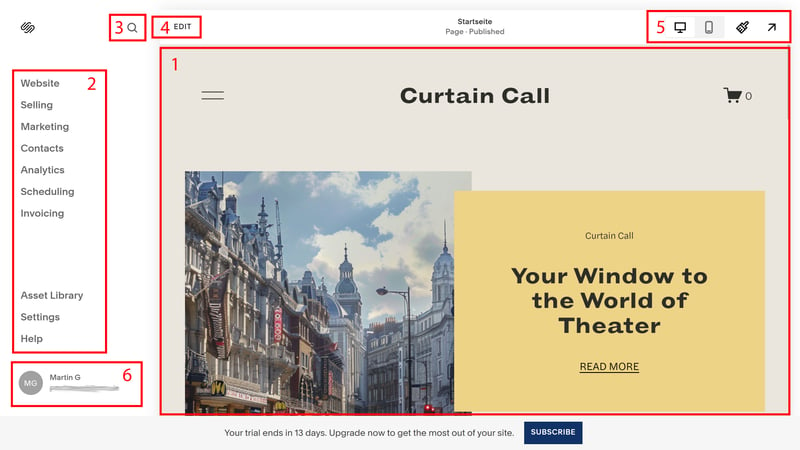
Squarespace's editor is logically divided into different areas.
- 1.
Live Preview: Most of the screen shows a live preview of your website. You can click through all areas of your site as it's currently designed and see exactly how they appear to visitors.
- 2.
Navigation Menu: Use this to easily jump between different panels in Squarespace's dashboard. Here, you'll manage most aspects of your site, from arranging your pages and subpages to maintaining your products (if you run an online store) and accessing marketing and analytics tools. You can also access your content library, where your photo and video files are stored, as well as settings and help.
- 3.
Search: The search bar lets you jump directly to specific pages or subpages of the admin interface.
- 4.
Edit: Click this button to open the website editor for the current page, allowing you to edit your site's content page-by-page (more on that later).
- 5.
Top Bar: The top menu bar lets you switch between desktop and mobile views to
see how your site appears on different devices. The brush button takes you to the “Site Styles” section, where you can adjust key design aspects (e.g., fonts, colors, and animations) across your entire site (more on that in a moment).
- 6.
Account: Click on your account icon to open a higher-level admin area. If you have multiple website projects, this is where you'll switch between them. You'll also find your domains and account settings.
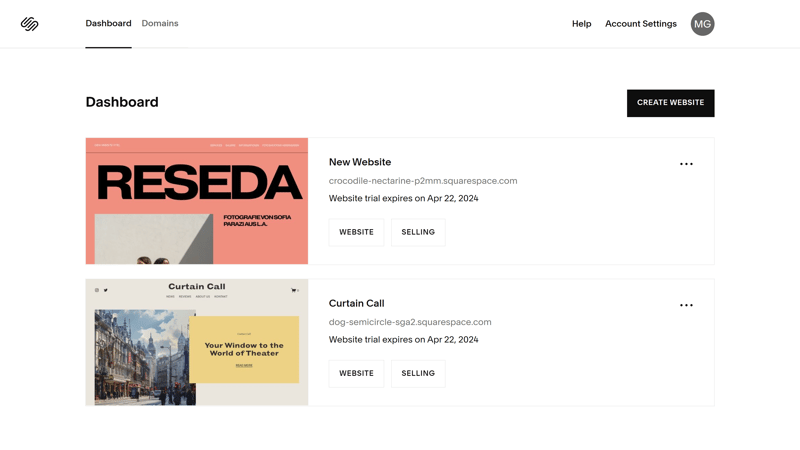
In the account area, you can switch between your websites and create new ones.
Once you know your way around the Squarespace dashboard, you can start customizing your site. There are many areas to work on, so it's best to take it step by step. Let's start with site styles:
Customizing Site Style
Open the “Site Styles” section by clicking the brush icon in the top right menu bar. This is a good place to start because any changes you make here are automatically applied globally to your site's pages and subpages.
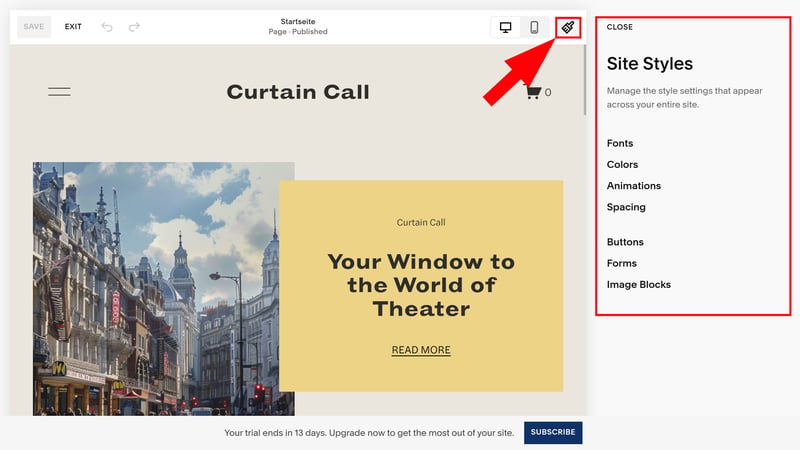
Design choices you make here will be applied site-wide.
There are seven style categories grouped into two areas.
Basic Design Elements: Fonts, colors, animations, and spacing.
Components and Content Blocks: Buttons, forms, and image blocks.
Customizing Fonts
Customize fonts by choosing predefined font packs or individual fonts for different text elements. Fortunately, Squarespace makes it easy to find fonts that suit your website.
You can choose predefined font packs that are already matched. They usually consist of two fonts: one for headings, one for paragraphs.
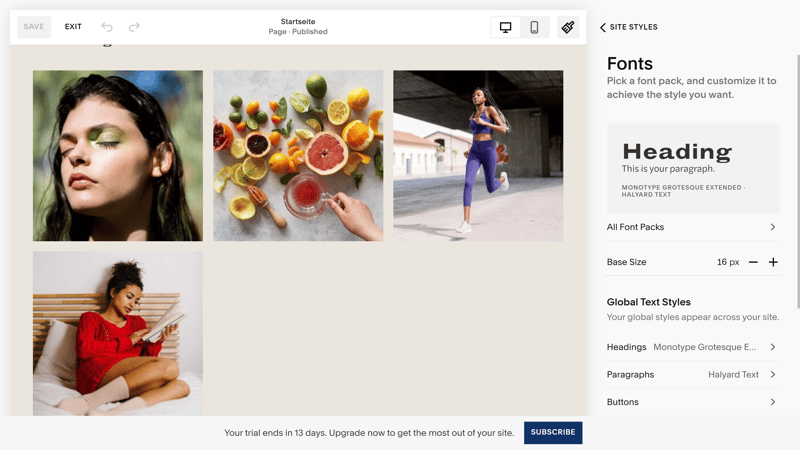
Choose a font pack that matches your style.
Once you've selected a font pack, you can customize individual fonts in the “Global Text Styles” section. You can also specify fonts for buttons and other kinds of text, like tags or product prices in online stores.
When you've found the right font, click “Save” in the top-left corner.
Adjust Colors
Squarespace makes it easy to find complementary color combinations while giving you plenty of tools to fine-tune your site's color scheme in detail.
First, select a predefined color palette. Squarespace will combine the palette's colors in different ways to give your website a unique look.
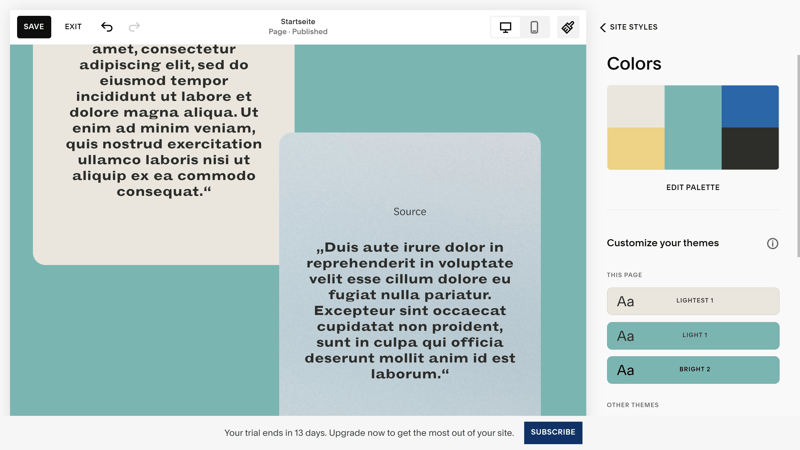
Color settings in Squarespace.
Of course, you don't have to stick with Squarespace's presets. You can customize the color of each element individually, either with options from your chosen palette or any other color, using Hex, RGB, or HSL codes.
Once you're happy with your website's color scheme, click the “Save” button to apply the settings globally.
Other Website Styles
In addition to fonts and colors, you can adjust several other site-wide style settings:
Animations
Choose an animation style for elements on your website, or disable animations altogether.Spacing
Set the maximum page width and the margins.Buttons
You can globally edit how buttons are designed, including their font, shape, and outline, and apply the changes to all buttons.Forms
Choose a general form pack that includes contact or booking forms and customize its elements, such as field shape, border thickness, and effects.Image Blocks
Image blocks include options for posters, cards, collages, and other visual elements.
You can adjust and tweak these elements anytime as you design your website.
Set Pages & Menus
Once your website has a basic design, it's time to give it structure. To start, ask yourself these three questions:
How should visitors navigate your website?
How many pages do you need?
Do you want to divide your content into subpages?
Ideally, you've selected a template that matches your desired page/ navigation structure. If not, don't worry — you can easily add more pages and adjust the navigation to fit your needs.
Create and Manage Pages
Click “Website” in the navigation menu to open the Pages panel. Here, you can see your website's pages, divided into two groups: “Main Navigation” and “Not Linked”. Unlinked pages won't appear in your website's main menu, which is useful for pages like your homepage or your privacy policy page.
You can drag and drop individual pages to adjust their position in the navigation menu.
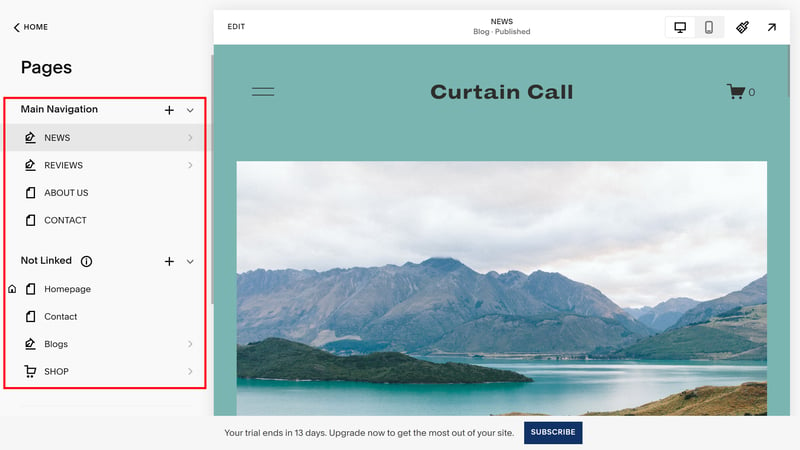
Add pages to your website.
Your template website comes with demo pages, which you can edit, delete, or replace at any time.
To add a new page, click the plus icon. You can either add a blank page and build it from scratch, or select a page template and fill it with your content.
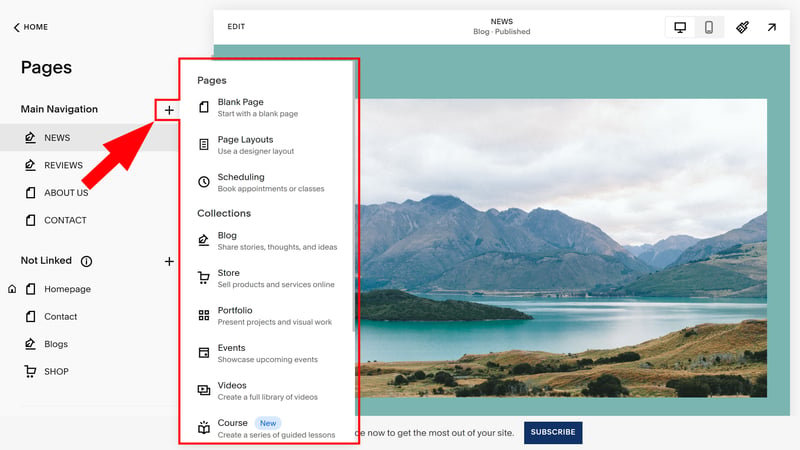
You can add a blank page or choose a template.
It's faster to choose pre-made pages and customize them. Squarespace offers a wide selection covering all important page types.
Pages and Collections
Under page layouts, you'll find regular content pages, like info pages, contact pages, galleries, or team pages. When you select them, they're added to your website with the global design preferences you specified earlier.
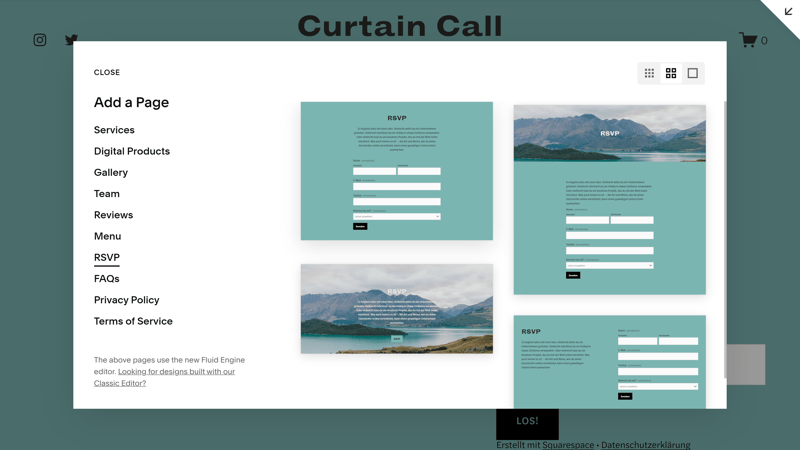
Add a new page from a Squarespace template.
Squarespace also offers advanced page types called collections, which include blogs, shops, portfolios, and events. These pages consist of multiple content elements, such as blog posts, products, or portfolio items.
You can manage these elements in a dedicated area. For example, on a blog page, you'll find a list of blog posts and the option to put them behind a paywall, allowing you to monetize your blog through a subscription model. On a shop page, you'll find extensive product management features.
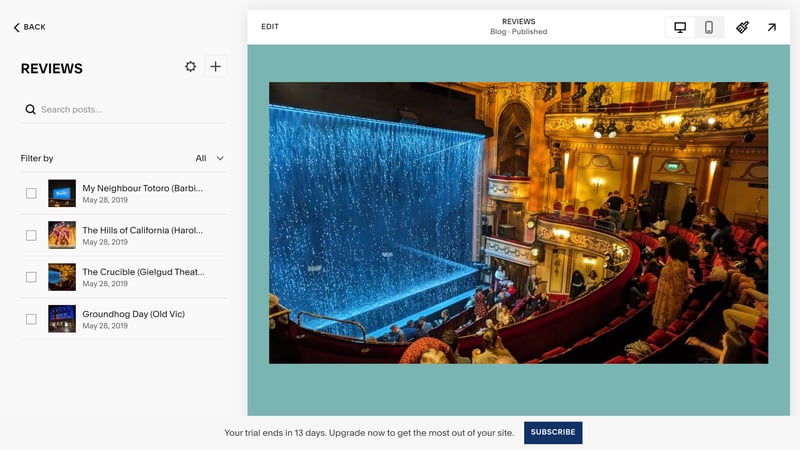
A blog page on Squarespace.
Page Settings
Click the gear icon next to a page title in the navigation menu to open the page settings submenu. These settings are divided into several sections:
Under “General,” you can specify the page title, navigation title, and the URL slug that appears in the browser bar. You can also copy the page, which saves time if you need to create multiple similar pages. Additionally, you can set the current page as your homepage or delete it.
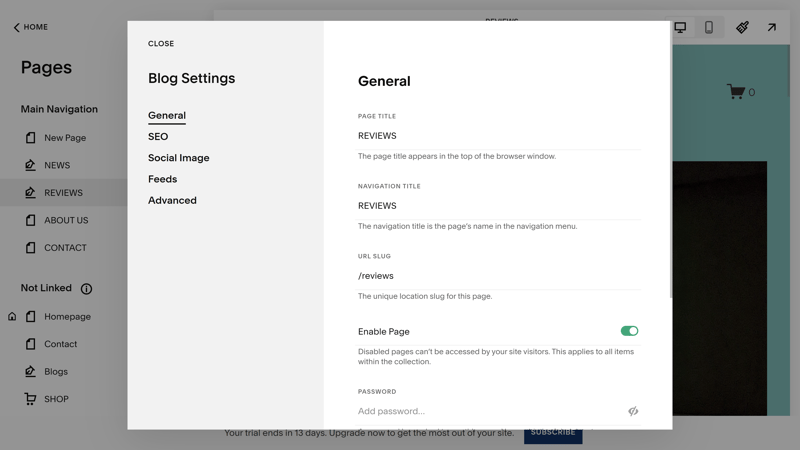
Page settings in Squarespace.
You'll also find SEO and social media settings, allowing you to manage how the page appears in search engines and on social media platforms. Under the “Advanced” section, you have the option to add custom code or scripts to further customize your page.
Subpages in Squarespace
Squarespace supports subpages, though they can be a bit hidden. To create subpages, click the plus icon and look for the “Dropdown” option under “More”.
This will add a dropdown folder to your navigation menu, allowing you to organize multiple subpages.
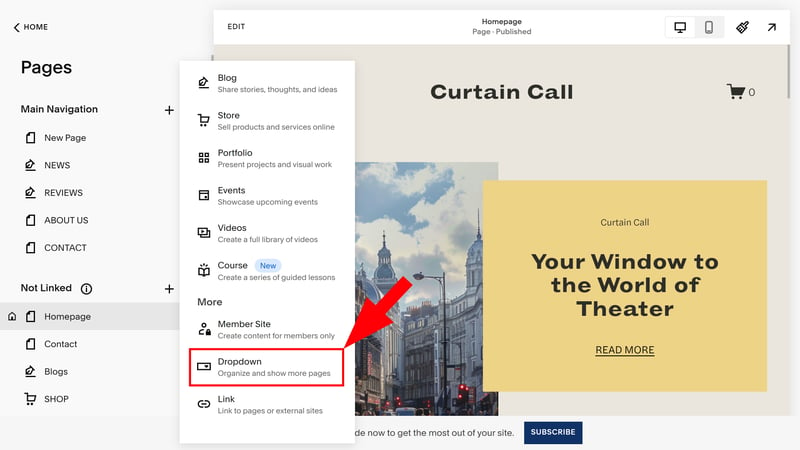
Subpages in Squarespace.
Unfortunately, Squarespace has some limitations here. The parent page cannot be an actual page with layout and content using built-in tools; it serves only as a placeholder for your subpages. You also can't go any deeper — so it's not possible to create sub-subpages.
Customize Content With Squarespace's Editor
Whenever you add a new page to your site, it will either be empty or filled with placeholder content. To make it yours, you'll need to fill it with your own content.
This is where the Squarespace design editor comes in, which makes website design simple with its drag-and-drop functionality. Open it by clicking the “Edit” button at the top left of the page you're on.
Sections and Blocks in Squarespace
Each Squarespace page consists of sections and blocks:
- 1.
Sections are the basic content areas that divide your website vertically. Each website is a stack of customizable sections.
- 2.
Blocks are specific content within these sections – like text blocks, images, buttons, forms, and more.
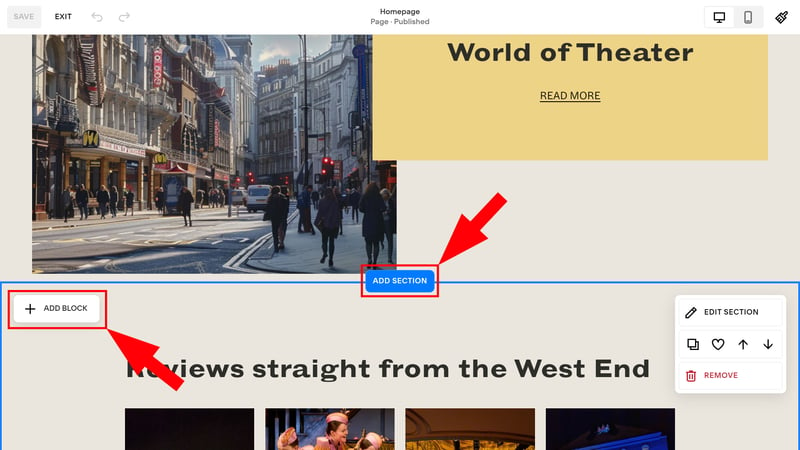
Every Squarespace page consists of sections and blocks.
Add and Edit Sections
To add a new section to your page, click the “Add Section” button that appears between sections marked by blue lines.
Just like with pages, you can choose from a range of pre-made sections categorized as “Contact,” “Info,” “Team,” or “Services.” For example, you might create a section on your homepage that links to your theater blog's latest reviews:
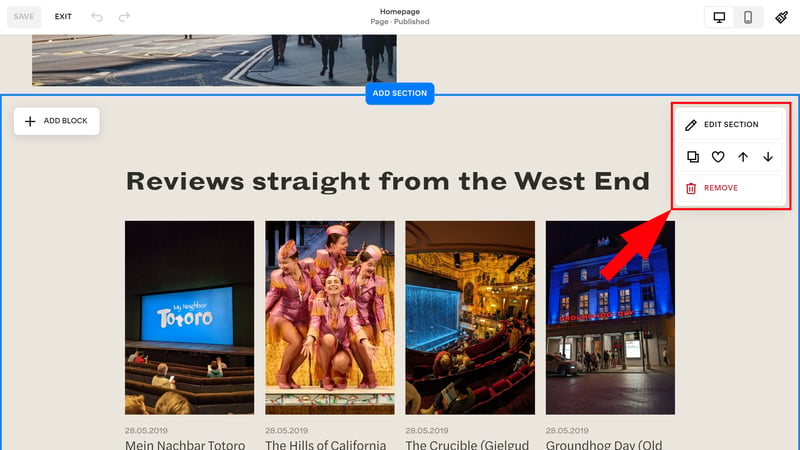
Add new sections and edit their design and layout.
A small box appears at the top right of each section, allowing you to move the section up or down, copy it, or add it to your favorites for quick access to sections with the same design and layout later.
Depending on the section, you'll have different content options. In a team section, you can add team members with names, job titles, and photos in the “Edit Content” area. In a gallery section, you'll manage photos in the “Edit Gallery” area.

Edit your section's content.
Click “Edit Section” to adjust general settings like format, background, and colors. Here, you can specify background effects and color schemes.
You can also set the number and size of rows or grids, which are important for arranging blocks in the section.
Add and Edit Blocks
Each section of a Squarespace page consists of multiple blocks, which are specific content elements. To add a new block, click the “Add Block” button at the top right of the section.
There are many predefined elements to choose from, which you can filter using the search bar. Options range from classic text and image blocks to forms, interactive elements, and embed codes.
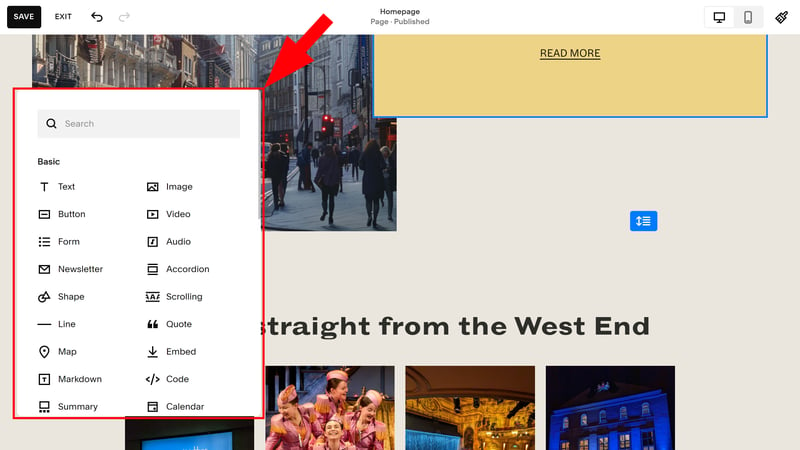
Now add specific content blocks to your section.
When you select a block, you can drag and drop it onto your page. The section's grid will become visible, with each section divided into small blocks where the content elements snap into place. Blocks can only be moved within the predefined grid, ensuring that the layout remains consistent.
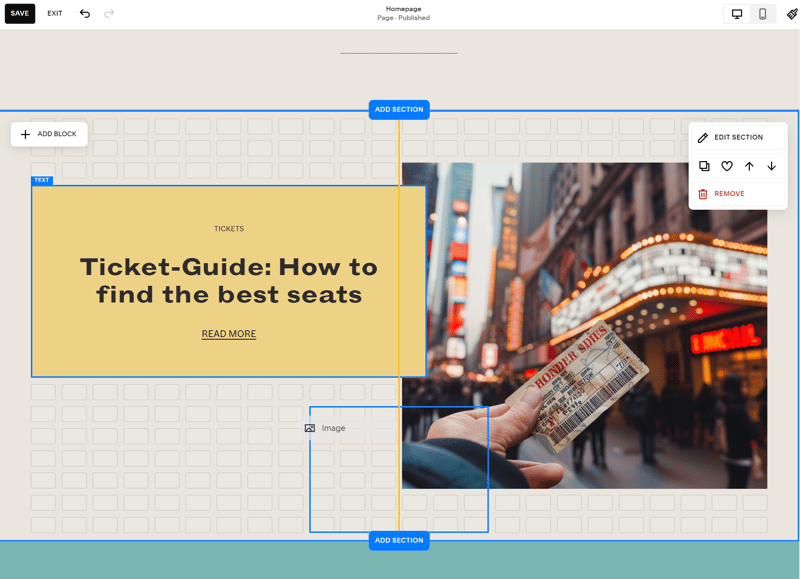
Drag and drop blocks onto your page.
You can now further edit your blocks. Most options are intuitive: You can resize blocks like in an image editing tool and adjust text directly in the live preview.
Clicking on a block opens a small menu at the top left with more options. Here, you can adjust your content's alignment, bring the block to the front or back, copy it, or delete it.
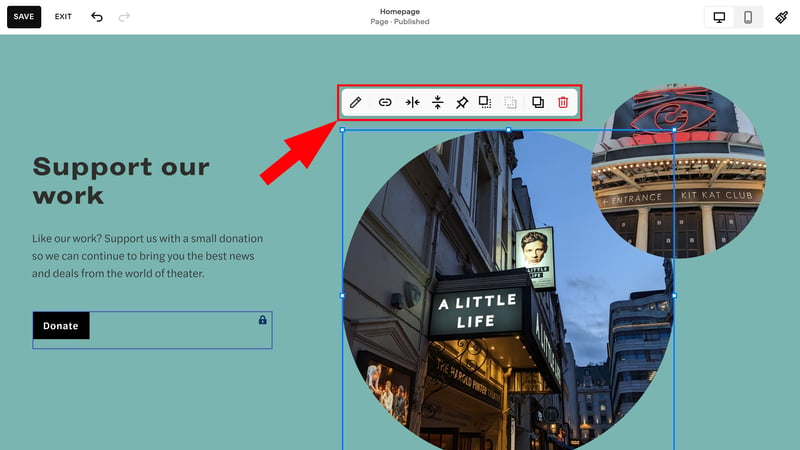
Now edit your block's content.
The brush button opens more settings that vary depending on the block type. In a text block, you'll find classic text processing options. In an image block, you can edit its content and design.
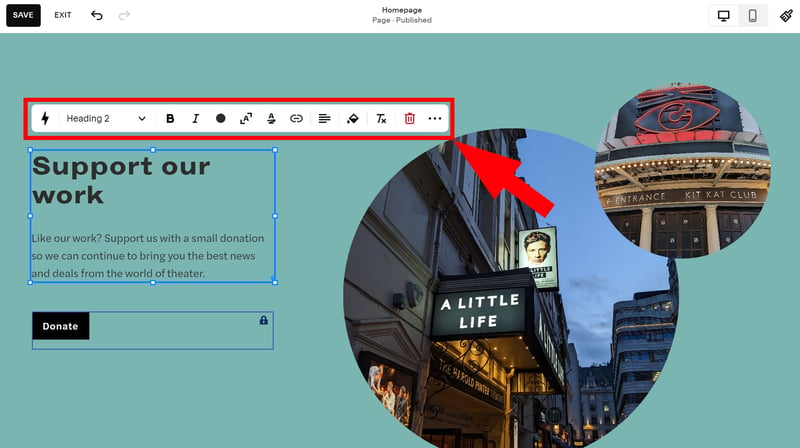
Detailed settings vary from block to block.
There are many more options and settings that we can't cover in detail. Overall, Squarespace's editor is highly intuitive, and it shouldn't take long for you to find all the important tools.
In our pinned video tutorial you can see the editor in action. You're welcome to ask our video editor Alex questions about specific features.
Edit Header & Footer
Once you've customized the design, created your pages, and added content, your website is nearly ready. If you haven't yet customized your header and footer, now's the time.
Your header and footer are consistent elements at the top and bottom of every page on your website. Editing them is straightforward with Squarespace.
Customize Header
To edit your header, simply hover over the top section of your website and click “Edit Site Header.”
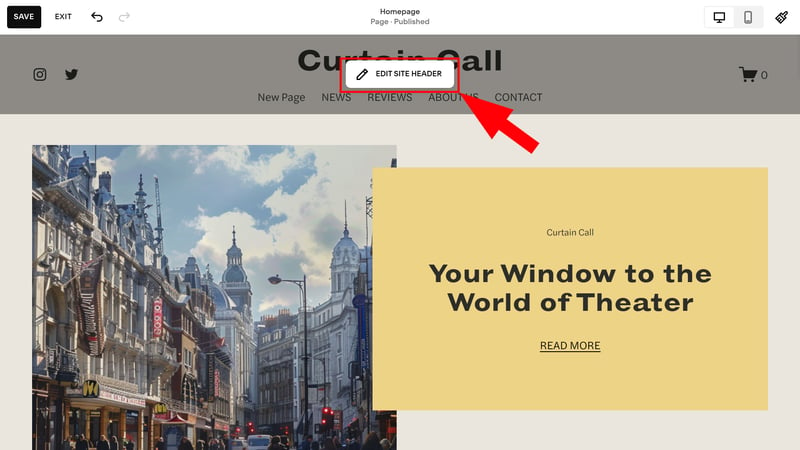
Edit your header.
You now have several options:
Click directly on areas of your header, like the site title, logo, social buttons, or navigation menu, to adjust their content.
Click “Add Element” to add items like buttons, social media links, or a shopping cart to your header. You can also enable a language switcher if your website will be multilingual.
Click “Edit Design” to adjust your header's layout and color scheme.
When you're happy with your header, click “Save” in the top-left corner as usual.
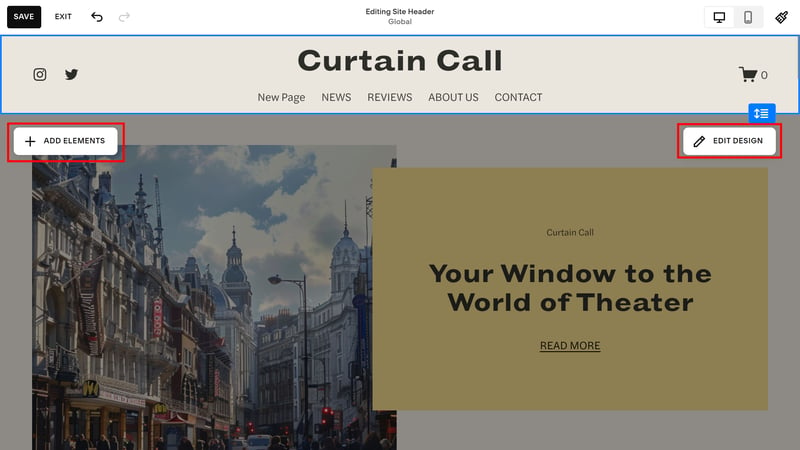
Header settings in Squarespace.
Customize Footer
Editing the footer is just as easy. Unlike the header, the footer is a regular section, so you have more freedom in customizing it. You can add and configure different blocks as you like.
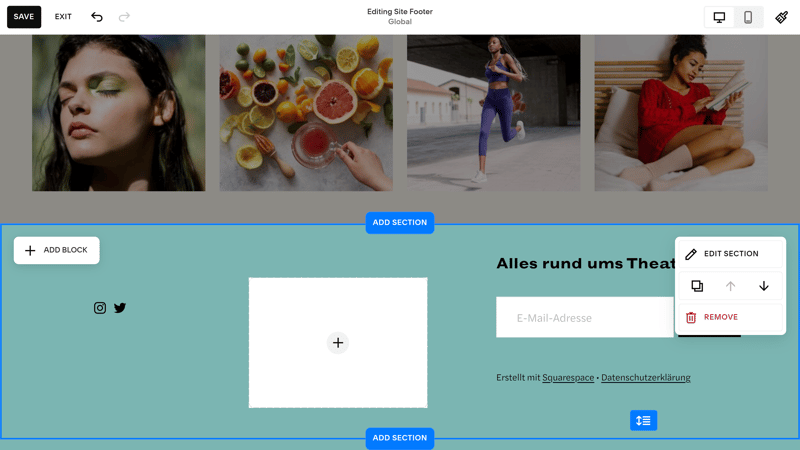
The footer also appears on every page.
Don't forget to link your legal notice and privacy policy in the footer.
Publish Website
Happy with your website's design and content? Have you finished all pages and subpages, set up your services and products, and customized the header and footer? If so, your Squarespace project is ready to go live.
Technically, your Squarespace website is already live, but it’s only accessible under a Squarespace subdomain. To make it accessible at a custom domain, you need to purchase a Squarespace subscription. Just click “Subscribe” in the info bar on the bottom of the page or navigate to Settings > Website > Website Availability.
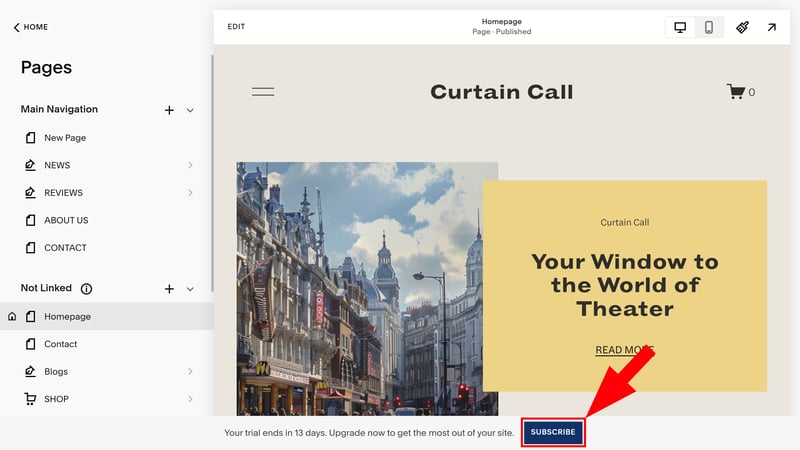
Now, book a Squarespace subscription.
Choose a Subscription
Follow the instructions and choose a Squarespace plan that suits your needs. There are currently four options, each differing in features, editors, and transaction fees: “Personal”, “Business”, “Basic Commerce”, and “Advanced Commerce”.
If you're unsure, it's okay to start with the cheapest “Personal” plan – you can always upgrade later. Just keep in mind that “Personal” subscriptions don't include e-commerce features.
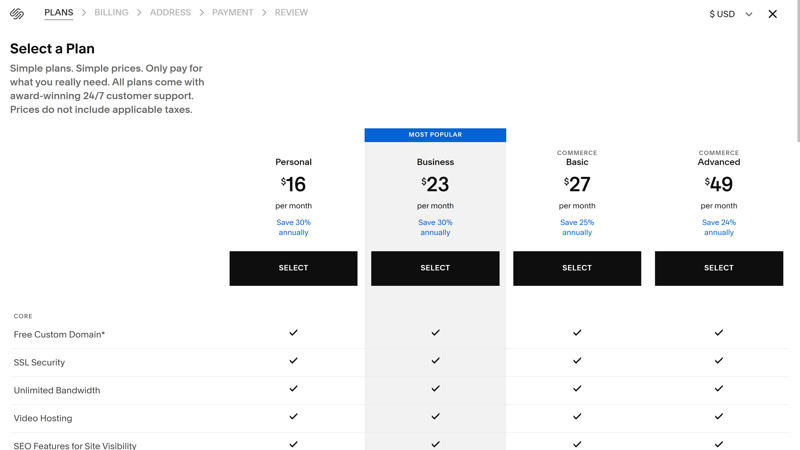
Choose one of the subscriptions.
Connect Domain
All Squarespace plans include a custom domain that you can use for free for the first year. You can set up the domain right after the purchase, or head to Settings > Domains and Email in the dashboard.
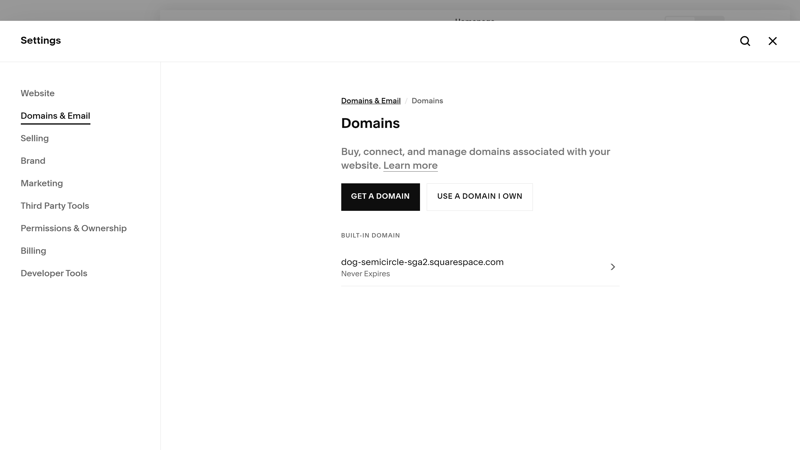
Connect your Squarespace website to a domain.
You have two options:
You can register a new domain directly in the Squarespace dashboard.
You can connect your website to an external domain that you already own. You also have the option to transfer the domain to Squarespace.
Great Job – Your Squarespace Website Is (Almost) Ready!
Once you’ve subscribed and set up your domain, your website is nearly complete and ready for visitors.
“Complete” might not be the right word, as a website is never truly finished. You’ve probably already noticed things you want to change, add, or remove.
A website has a life of its own. If you want it to be successful, you'll need to continually update, optimize, and refine it. With the foundation now set, this shouldn't be a problem. Good luck!
Conclusion
Squarespace is one of the most user-friendly website builders out there. Even if you have no coding or design skills, you can create a modern and professional website in just a few steps. Choose a template, customize it, set up pages and menus, and tweak your content using Squarespace's drag-and-drop editor.
Still not sure if Squarespace is right for you? Check out our in-depth website builder comparison, where we tested 12 providers to help you make the best choice. We've also put together a list of the top alternatives to Squarespace.


