Think of themes as clothing for websites - at least on the world's most popular content management system (CMS). WordPress themes are the outfits that you can cloak your site's content in. However, before changing its digital wardrobe, you'll need to install the theme of your choice.
In this step-by-step guide, we'll walk you through the process of installing WordPress themes, and let you know what to pay attention to.
Prior to Installation
Before altering your website's look, keep in mind that adjustments can significantly alter its functionality.
For example, if your website is full of plugins and features, a single click could disrupt the balance you've achieved. But don't worry: It's easy to revert changes. To be on the safe side, you might want to consider creating a backup.
Install a WordPress Theme
There are two main sources for WordPress themes: WordPress and third parties.
WordPress comes with a huge theme repository that contains thousands of free, easy-to-install templates.
Should this selection of free themes not do the trick, you can look for third-party options. Typically, you'll need to pay for these and install them slightly differently than WordPress's offerings.
Below, we'll show you how to install both kinds of themes.
Install an Internal WordPress Theme
Installing a new WordPress theme from its repository only takes a few clicks.
Step 1: Once in your WordPress dashboard, click on Appearance in the side menu, followed by Themes. On the start page, you'll see a list of installed themes.

Available themes can be found directly in WordPress's backend.
Step 2: Click on the Add New button to select a theme. Using the tabs along the top of the window, browse the most popular or latest themes. By clicking on Feature Filter, you can specify which features the theme should have.

Sort themes by their popularity and other criteria.
Step 3: Once you've found a theme that's interesting, click on it to open a brief description, as well as a Demo link. This is a website where the theme is in use.

Use the preview to see what the new theme is capable of.
Step 4: Should you like the theme you've found, you can install it. Don't worry: This won't change your existing design.

Now, the new theme is installed.
Step 5: After you've installed a theme, use the "Live Preview" option to see how your website will look with it. Most of the time, you'll notice small things that need to be changed since your existing content will be automatically displayed. You can make adjustments in the preview and experiment with the new design.
In the navigation window, you can also check how your new theme will display on tablets and smartphones.

With WordPress's Live Preview, you can see how the new theme looks on your site.
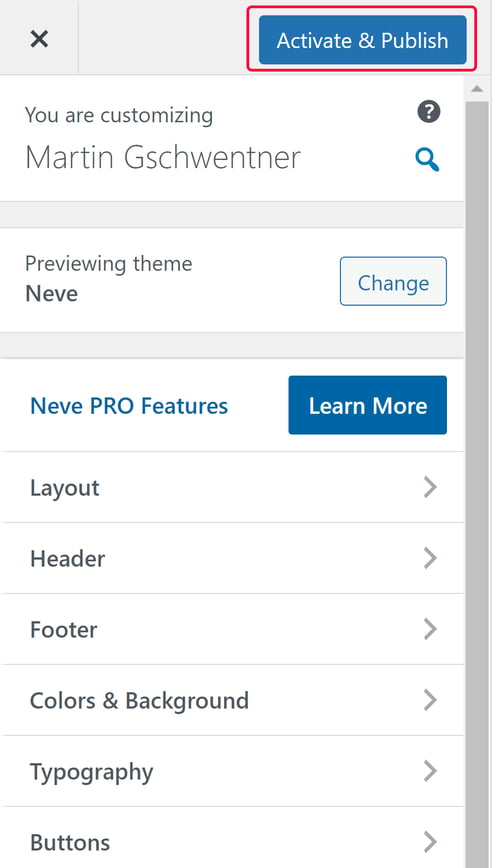
Step 6: If you're satisfied with the new design and want to adopt it, click on "Activate and Publish" in the upper left.

All that's left to do is activate the new theme.
Your new WordPress has now been activated and you can adjust and optimize it for your website.
Install a Third-Party WordPress Theme
In addition to WordPress's official themes, there are numerous third-party marketplaces that offer a huge selection of design options. Two of the most well-known of these are Envato Market (previously ThemeForest) and ElegantThemes. After purchasing a theme, you can install it on WordPress with just a few clicks.
Step 1: The first thing to do is to buy an external theme, a process that differs from marketplace to marketplace. On Envato Market, there's a live preview tool similar to that offered by WordPress, making it possible to familiarize yourself with the theme before purchase. If you like what you see, all that's left to do is add it to your shopping cart and complete your order. After that, you'll typically be able to download the theme as a Zip file.

Envato Market is one of the largest online marketplaces for WordPress themes.
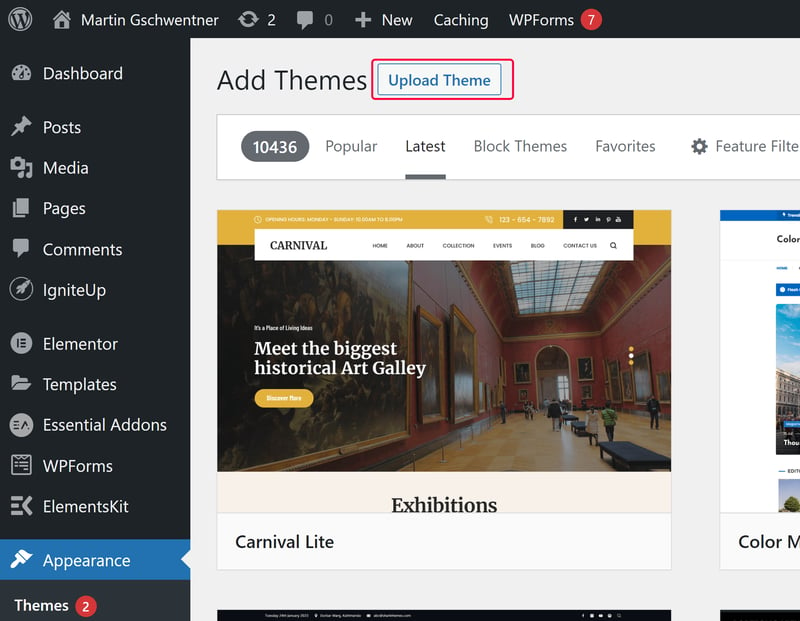
Step 2: Now, open the Themes menu in your WordPress dashboard. Click on the Upload Theme button near the top. Then, select the theme you've purchased (you don't need to unzip the file).

Now, upload the third-party theme you purchased.
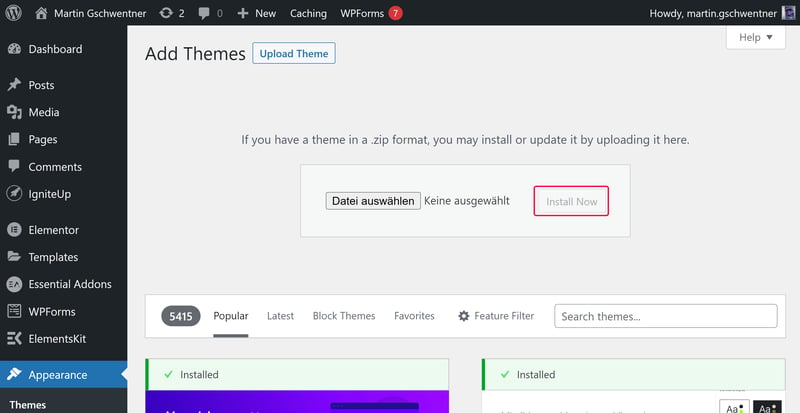
Step 3: Once you've select the correct Zip file, click on Install Now.

All that's left to do is install the theme you purchased.
The theme has been installed and should immediately appear in your theme overview. You can now add it to your website as discussed in the "Internal Themes" section above, or make changes to it using WordPress's live preview feature.
Conclusion
If you'd like to get your WordPress website some new digital threads, there are plenty of options: WordPress offers thousands of free themes in its repository. Should you not find what you're looking for there, you don't have to settle for what's on the rack, but can purchase something more exclusive from a third-party marketplace like Envato Market.
Regardless of which option you select: Installing WordPress themes is simple and only takes a few clicks. Are you ready to load up your new WordPress website with useful plugins? If so, be sure to check out our guide to installing WordPress plugins.


